안녕하세요.
디자인도 하고, 개발도 하는 '디발자 뚝딱'입니다.
이번 포스팅에서는 리액트에서 api 호출했을 때 로딩화면/스피너 넣는 방법에 대해 공유하겠습니다.
어렵지 않으니 차례대로 따라해 주세요!
이 글은 이미 리액트 프로젝트가 만들어져 있다는 가정 하에 작성된 글입니다.
1. 로딩화면 컴포넌트 만들기
Loading.js를 생성하고 아래의 코드를 입력해 주세요.
// Loading.js
import React from 'react';

export const Loading = () => {
  return <div>Loading</div>;
};

export default Loading;
2. 로딩화면의 스타일을 잡기 위해 styled-components를 설치합니다.
styled-components를 사용하고 싶지 않으시다면, 스타일만 따라해 주세요.
터미널을 열어 아래의 코드를 입력해 주세요.
npm i styled-components
3. 로딩화면 ui/style을 잡아볼게요.
Loading.js 컴포넌트의 코드 내용을 아래처럼 바꿔주세요.
// Loading.js
import React from 'react';
import {Background, LoadingText} from './Styles';

export default () => {
  return (
    <Background>
      <LoadingText>잠시만 기다려 주세요.</LoadingText>
    </Background>
  );
};
그리고 Styles.js 파일을 만들어서 아래의 코드를 입력합니다.
// Styles.js
import styled from 'styled-components';

export const Background = styled.div`
  position: absolute;
  width: 100vw;
  height: 100vh;
  top: 0;
  left: 0;
  background: #ffffffb7;
  z-index: 999;
  display: flex;
  flex-direction: column;
  align-items: center;
  justify-content: center;
`;

export const LoadingText = styled.div`
  font: 1rem 'Noto Sans KR';
  text-align: center;
`;
4. 스피너를 다운로드 합니다.
loading.io - Your SVG + GIF + PNG Ajax Loading Icons and Animation Generator
Build Your Ajax Loading Icons, Animated Text and More with SVG / CSS / GIF / PNG !
loading.io
해당 홈페이지에 접속하여 원하는 모양의 스피너를 만들어 주세요.
아, 참고로 이미지에서 주황색 체크표시로 표시되어 있는 것처럼 배경의 불투명도를 0%로 설정하셔야 해요.
그래야 어떤 배경이든 스피너를 깔끔하게 넣을 수 있답니다.
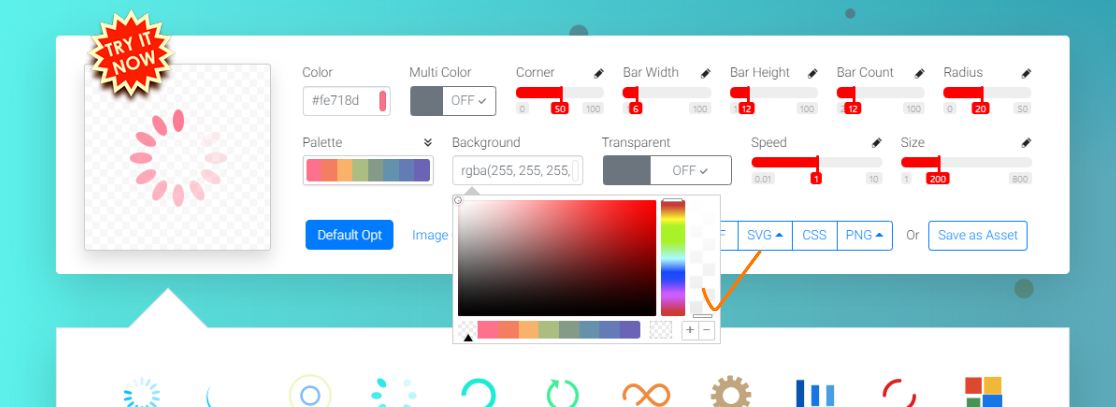
다운로드는 GIF 확장자로 진행해 주세요.
해당 과정에서 회원가입을 해야 합니다.
스피너 모양 중 [FREE]로 표시되어 있는 스피너는 무료이니 안심하세요!

5. 다운로드한 스피너를 Loading.js 파일에 import 합니다.
// Loading.js
import React from 'react';
import {Background, LoadingText} from './Styles';
import Spinner from './assets/spinner.gif';

export default () => {
  return (
    <Background>
      <LoadingText>잠시만 기다려 주세요.</LoadingText>
      <img src={Spinner} alt="로딩중" width="5%" />
    </Background>
  );
};
6. Loading.js 컴포넌트를 App.js 파일로 불러와 사용해봅시다.
useState를 통해 Loading의 상태를 관리할 건데요.
true이면 화면에 보여주고, false면 화면에서 보여지지 않게 처리를 합니다.
fetch가 시작될 때는 Loading의 상태를 true로 바꿔주고,
fetch가 완료됐을 때는 Loading의 상태를 false로 바꿔줍니다.
즉, api 호출이 완료되기 전까지는 로딩화면(Loading.js)이 보여집니다.
// App.js
import React, {useState, useEffect} from 'react';
import Loading from './Loading';

export const App = () => {
const [loading, setLoading] = useState(true);

const mainApi = async () => {
	setLoading(true); // api 호출 전에 true로 변경하여 로딩화면 띄우기
    try {
      const response = await fetch(`api url`, {
        method: 'POST',
        headers: {
          Accept: 'application/json',
          'Content-Type': 'application/json',
        },
        body: JSON.stringify(),
      });

      const result = await response.json();
      console.log('mainData', result);
      setLoading(false); // api 호출 완료 됐을 때 false로 변경하려 로딩화면 숨김처리
    } catch (error) {
      window.alert(error);
    }
};

    useEffect(() => {
        mainApi();
    }, []);

    return (
    <div>
      {loading ? <Loading /> : null} // Loading이 true면 컴포넌트를 띄우고, false면 null(빈 값)처리 하여 컴포넌트 숨김
      <div>페이지 내용들</div>
    </div>
    );
};

export default App;
7. 완성된 화면을 확인해 볼까요?


